Wednesday, February 8, 2017

4:48 PM 0

Workout Wednesday: The Roll-Up

I'm not quite sure how it's already Wednesday...I think between having two little ones and trying to keep caught on laundry and dishes- the days slip away. But before I start rambling about how many loads of laundry I have left to fold, let's talk Workout Wednesday.

Last week, I gave you step by step how to do The Hundred, which is the first exercise in the Pilates mat.  Read about it here. I've been on a mat kick lately, especially since the weather has been perfect lately. I mean highs in the upper 60s in February?! So I've been rolling out my mat outside and doing some Pilates. I highly suggest it.

So for Workout Wednesday today, let's stick with some mat work again with the second exercise found in the Pilates Mat- The Roll-Up. Totally makes me think of the Fruit Roll-Ups I ate all the time as a kid (the food dye and high amounts of sugar in them makes me cringe now...) Before you do the Roll-Up, do yourself a favor and get your core nice and activated with The Hundred. Remember- 10 repetitions total and 1 repitition equals inhaling for 5 counts and exhaling for 5 counts.


The Roll-Up
Again, this is the second exercise you'd typically do in a mat class. This exercise helps you learn to articulate through your spine, stretch your hamstrings, and of course strengthen your powerhouse.

Steps:
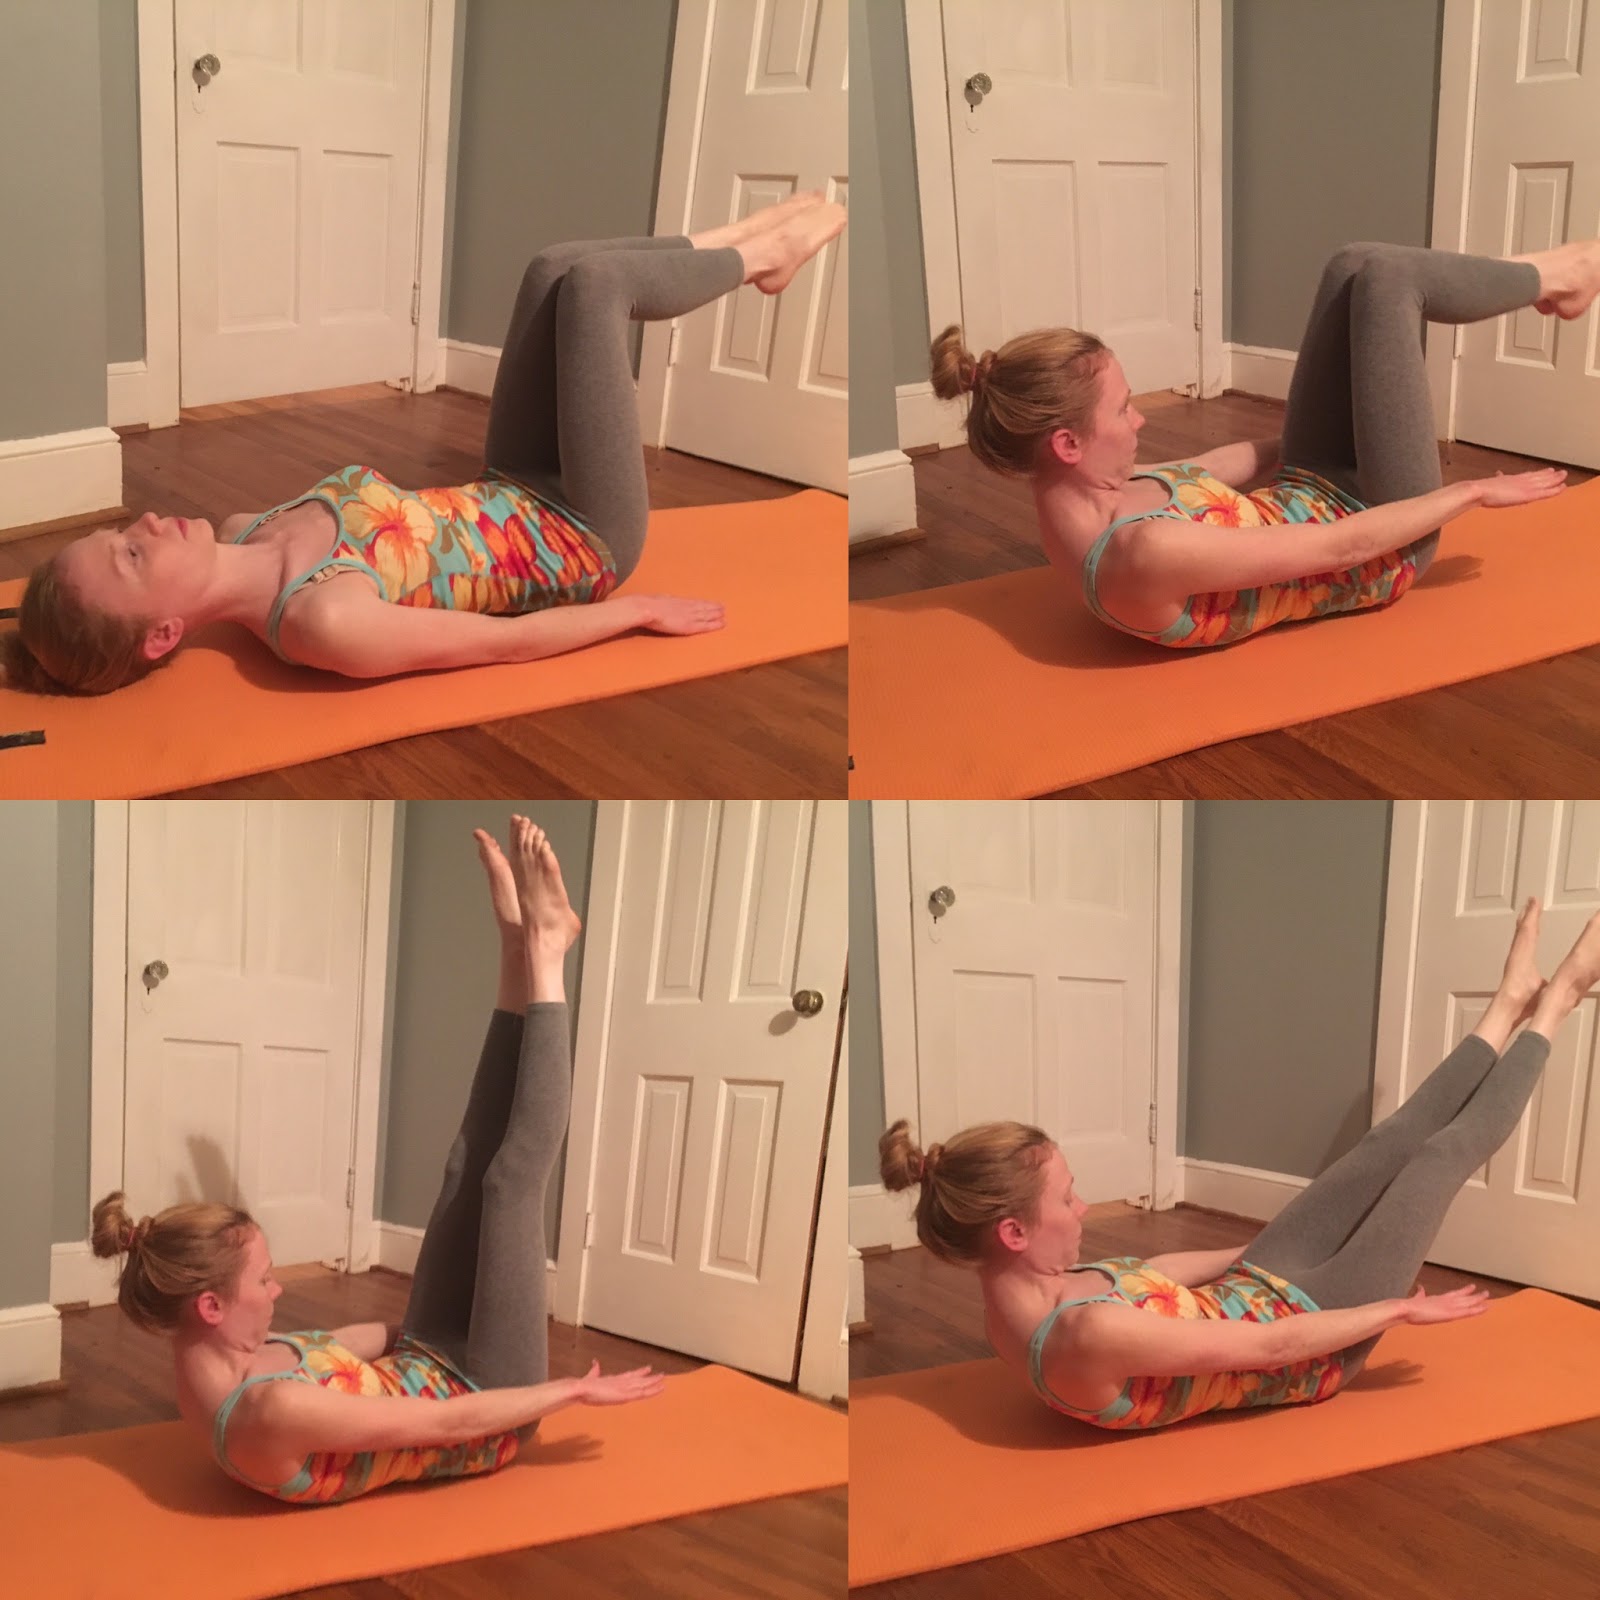
1. Following The Hundred, fold your feet into your chest, then staying lying flat on your back- press your feet into the mat with knees bent. Arms extend long by your sides. (This is a great place for Beginners to start practicing this exercise.)

2. To advance The Roll-up, begin with your legs extend out long with feet in Pilates stance (heels together and toes apart.)
3. Bring your arms lifted above your ears. Do not let your arms rest on the mat over your head.
4. To begin The-Roll Up, inhale and begin to roll up into a seated position, making sure your chin relaxes into your chest. Keep your arms lifted as close to your ears at possible. (Drop your shoulders here...I'll credit my raised shoulders to my little photographer assistant, who had me hold this position awhile before she took the picture haha..)
5. Round forward over the legs, pulling your abdominals up and in, sinking navel to spin. Exhale and reach towards your toes. You should feel a stretch through the hamstrings here. (If you modify the exercise by keeping knees bent and feet pressed into the mat, be sure to stretch your legs out long during this part of the exercise.)
6. To roll back down onto your mat, inhale and pull the belly in. (If you modified The Roll-Up, go ahead and bend the knees again with feet pressed into the mat.)
7. Using your exhale, roll back down onto your mat imagining you are placing one vertebrae at a time back down onto the mat. Chin drops down into the chest.
8. Shoulders and then the head are the last to arrive back down to the mat.

9. Arms float back lifted above the ears before beginning the next repetition.
10. Do 3 to 5 repetitions of The Roll-Up. One repetition equals rolling all the way up and rolling on the way back down to the mat.

Modifications:
1. Start working on this exercise first by keeping the knees bent and feet pressed into the mat.
2. You may grab on to the backs of the thighs to help you roll up into a seated position, as well as roll back down onto the mat. This is a perfect way for beginners to learn to articulate through the spine. This modification can also help take any strain you feel out of the neck.
3. As you build powerhouse strength, extend your legs all the way out long with feet flexed in Pilates stance. If you work the exercise this way, be sure to not allow the feet to come up off of the mat and avoid jerking yourself up off of the mat- use your core!

Teacher Tips:
1. Your breath will help you keep the exercise fluid and give you power. Use your breath, especially the exhale, as your start to roll up and feel stuck.
2. Try working on this exercise by hooking your feet under a couch with legs extended out long. This gives you some support.
3. Don't use your head and shoulders to pull you up- activate those deep abdominal muscles by creating an oppositional force with the navel sinking back into your spine.
4. Keep the lower body (hello inner thighs!) engaged by keeping the heels together and gluts squeezed in- remember your powerhouse includes more than the abdominal muscles.
5. Also, imagine the lower body is taped down to the mat- it should not move.
6. Enjoy the stretch you'll find in this exercise.
7. If you do your mat outside, be prepared for the wind to catch your mat!


Thanks for joining me for Workout Wednesday! Join me back next week for another Pilates Mat exercise. (Then we'll know a good portion of the Beginner's Mat!)


Tuesday, February 7, 2017

6:35 AM 0

Buying Organic Food at Aldi Without Breaking the Bank

Now, I did not always use to buy organic- I've definitely gone in phases. But with little ones eating around the table, I just really can't stand the thought of serving up a plate full of pesticides, chemicals, and added hormones. With that in mind, one of my goals coming into the new year was to cut out most processed foods and by more organic foods. I talked a little about this here, but for more inspiration why to do this- read here and here.

With that in mind- if I did not have a grocery budget, you would totally find me at Earth Fare. The produce selection in Earth Fare is amazing and you can find an organic option for everything on your grocery list! The atmosphere in Earth Fare is perfect and they have a great selection of ready-to-eat foods (especially hot and ready pizzas). But if I did all of my grocery shopping at Earth Fare or even Harris Teeter, I'd be way over my weekly budget.

Cue why Aldi is now where I do a majority of my grocery shopping. You can find so many organic options at Aldi for at least less than half the cost of what it would be at Earth Fare, Whole Foods, or Harris Teeter AND for the same and/or less than the cost of non organic options at Food Lion. Sounds like a win, right?!

 Now, if you've never been to Aldi, here are a few things to keep in mind and bring with you:
1. Bring a quarter to get a grocery buggy, which you get back when you return it.
2. Bring reusable shopping bags, but if you forget them you can buy reusable or paper bags at Aldi.
3. Use empty boxes left on the shelves to bring home boxed or easily squished items like bread and bananas.
4. Be prepared to bag up your own purchases, which is why I mention #2 and #3. This is also why I try not to do my Aldi shopping with kids.
5. Avoid shopping on Sundays between 12 and 5 pm. Maybe it is just my local Aldi, but I've gone shopping there then and it was a mad house.
6. They are remodeling and expanding my local Aldi and from what I understood this is going on at many Aldi stores currently. Aldi is going to be expanding their product selection. This doesn't really change anything, but there might be construction currently going on.
7. Keep in mind the selection varies a little bit week to week, so you may not find everything you need on your grocery list.


While I do buy some things at Aldi that are not USDA Certified Organic or not even food for that matter, I'm just going to share my Organic finds from Aldi today.

Here's what I buy from Aldi on just about a Weekly Basis (all of these items are USDA Certified Organic):
1. Eggs (only 3.49 for a dozen!)
2. 2% Milk
3. Apples (typically they have Gala)
4. Bananas
5. Plain Yogurt
6. Frozen Strawberries
7. Frozen Blueberries
8. Baby Spinach and/or Salad Spring Mix
9. Baby Carrots


Here's what I buy from Aldi as needed (also USDA Certified Organic):
1. Coconut Oil
2. Extra Virgin Olive Oil
3. Brown Sugar
4. 100% Pure Cane Sugar
5. Brown Rice
6. Pasta Sauce
7. Whole Wheat Pasta
8. Chicken or Vegetable Broth
9. Quinoa
10. Honey
11. Ketchup
12. Unsweetened Apple Sauce
13. Chia Seeds
*I should add while I don't buy these items every week, I've always seen them in-store.

Here's what I buy from Aldi when they have it (also USDA Certified Organic):
1. Blueberries (They have only had organic blueberries in stock once this past month, but I think it is related to the season. I'm hoping the organic produce section will be bigger this summer/spring.)
2. Nuts
3. Apple Juice
4. Cherry Tomatoes
5. Creamy Peanut Butter

I'm still working on some practical ways to buy organic and eat better without breaking the bank, so I'll share more tips as I learn. But Aldi is a great place to start. So if you have an Aldi in your area, go check it out when you need to go grocery shopping this week.


Monday, February 6, 2017

12:36 PM 0

Working Out with Kids

I totally understand how hard it is to workout with kids- especially when your kids are young and need a lot from mommy, including diaper changes, nursing, help using the potty, something to eat, and the list goes on. There is so much to get done everyday...right?!? Get laundry washed and folded. Prep dinner and get the dishes washed.

Some days look like this too if you stay home with your kids. They both need mommy (or in this case I jokingly say- poke your eyes and pull your hair out.) Even with all of that going on- it is SO important and good for you to workout! These are some ways I try to get my workouts in during the week.

1. Workout early in the morning before the kids get up and/or during the kids' nap time. 
Obviously this is my goal on days I am not teaching in the studio or I do not plan on going to Yoga class. Yes, this my ideal goal, but does it always happen? No! There are days I really do not want to get up early and I want to stay in bed for as long as possible...until little ones starting calling for me. And I love it when both kids nap at the same time, but this does not happen everyday either. And if they do nap at the same time- sometimes I've got to choose between working out OR making dinner, doing the dishes, and tackling the mountain sized pile of laundry. Even though I'd be sooo happy if I could accomplish all of this during nap time, but I'm not superwoman.

2. Go to a group fitness class WITH childcare.
I think it's such a genius idea for gyms, yoga studios, and fitness centers to offer childcare. I don't have to use this option very often, but it's nice to have available. Kids get to play and have fun and you get to workout (without distractions) sounds like a win in my book.

So when #1 or #2 doesn't work out, I result to either #3-6 or all of the below!

3. Roll out an extra mat for the kids and workout (or at least try...)
So I think my oldest LOVES Yoga/Pilates mats. In fact, I think she's claimed them as her own. And if I can't find my mat, it's probably because she has been playing with it. And its not uncommon to find toys on the mat. See below. Yes, Anna and Elsa do Pilates. My oldest loves to roll herself up in the mat like a burrito or pretend the mat is her bed (she folds the mat in half to make a blanket). So there you have it- mats double as toys in our house.

4. Encourage your kids to follow your workout and copy you!
I think it is so important to model a healthy, active lifestyle to your kids. Little ones love to mimic what they see grown ups do around them...and they pick up on so much that we often don't even realize at the time. That being said- my oldest loves to get on her mat beside me and try to do what I am doing. Yes, she'll do The Hundred and try Rolling Like a Ball. And we have fun together!

5. Have your kids help you workout.
It is as simple as that. Have your kids help you get things you need during your workout. "Hand mommy the weights, or the yoga block, the strap, the magic circle..." My oldest loves to help mommy, so this keeps her occupied at least for a few moments.

6. Pull out your their favorite snacks, toys, and you name it- and power through your workout.
Sometimes I'll work out when my oldest eats a snack in the afternoon. I'll get the snack out and then start working out. Or I'll pull out activities that she can do by herself that take a little time, such as play dough. One thing I don't do is turn the TV on while I'm working out. Maybe it is a silly rule I have, but I want to instill in my kids being active and I just can't justify turning the TV on just so I can workout.

I hope this motivates you or gives you some ideas to try so you can squeeze whatever workout you prefer into your day when you have little ones.


(For this post I'm linking up with A Fresh Start on A Budget for Motivational Monday and The Life of Faith for Mommy Moments.)


Saturday, February 4, 2017

12:47 PM 0

Saturday Reads and Inspiration


 Hello Saturday! Here are some great reads I've come across this week for you to checkout this weekend, including some inspiration for your Super Bowl Party tomorrow. Enjoy!

1. Olympic athletes that do Pilates- (read here.)
I shared this article this week on my Facebook page, but in case you missed it- check this article out! Missy Franklin and Kerry Walsh-Jennings are two of my favorites...I mean obviously they are both are in incredible shape, but I had no idea that they do Pilates.

2. Health benefits of drinking lemon water- (read here.)
I talked yesterday about why I drink lemon water. It is a great boost for your immune system because it is high in Vitamin C. But there are lots of other reasons to drink lemon water, such as reducing blemishes and joint pain. Plus- lemons give your water some flavor to help you increase how much water you drink.

3. Healthy and delicious Super Bowl Food ideas.
I'm still working on my Super Bowl menu, but I've seen some great ideas here, here, and here. I plan on teaching Pilates, taking a Yoga class, and then enjoying some yummy food tomorrow.
 

Friday, February 3, 2017

5:09 AM 0

Five on Friday- Fighting Sickness and New Workout Gear

Happy Friday! I'm ready for a busy weekend, including starting two new Pilates class series this weekend.

We've had lots of sickness floating around our house the past few weeks, including the dreaded stomach bug. BUT I'm happy to report everyone has been healthy the past week and a half. So today I'm going to be sharing a lot about what I did to stay healthy and get over sickness faster.

O N E 
Vitamins
I'm a big fan of Probiotics and take them daily- they are so good for you and perfect for digestive health. Read here why. I take the Standard Process Probiotics 3 times a day, but when the stomach bug started, I increased to 4-5 times a day for an extra boost.

Once everyone started getting sick in my house, I also started taking my Immuplex vitamin again (also made by Standard Process.) I took this vitamin throughout my pregnancy (2 capsules, 3 times a day,) but hadn't been taking them lately. When sick or exposed to sickness, I take a total of 9 capsules a day (usually I would take 6 a day.) I swear by Immuplex- I avoided getting the Flu last year when everyone else in my house had it and I credit that to these vitamins.
I get both of these vitamins from my chiropractor, so you won't find them in store- check with a chiropractor or other wellness provider. But they are good quality vitamins and are made from whole foods, which is why you have to take more of them. (Side note- I shared yesterday about why I started going to the chiropractor. Click here. You should definitely check that out if you are pregnant!)

T W O
Lemon Water
I love drinking lemon water. But when sick or exposed to sickness, I drink it at least once a day. Lemons are a great boost for your immune system because they are high in Vitamin C. We did not have any lemons at home, so I used my Young Living Lemon Vitality essential oil instead. I put 1-2 drops in my water using my Yeti cup to keep it cold and refreshing.

T H R E E
DiGize Essential Oil 
That being said, I did end up getting the stomach bug. Like a week and a half later after everyone else was healthy. I'm not sure what happened, but I will say I had stopped drinking lemon water and had stopped taking my Immuplex vitamins two days before I got sick (bad move on my part.)

So anyways, this gave me the perfect opportunity to try my new essential oil DiGize. This is an essential oil blend made from Young Living- read more about it here. I had heard great things about this oil and ordered it after my house came down with the stomach bug.
Once I started feeling sick, I rubbed a mixture of coconut oil and one drop of the oil on my stomach in a circular motion. As soon as I did this, I would feel relief from my nausea. I did this several times the day I was sick. I only got sick on my stomach one time and just felt flu-like for the rest of the day. I credit that to my vitamins, the lemon water, and DiGize oil because everyone else was a thousand times sicker and for much longer than I ever was with the bug.

F O U R 
Lululemon- Align Crop Leggings
What better way than to celebrate surviving the stomach bug than a new pair of workout leggings! I picked these crop leggings up last week. I'm obsessed. Like if I'm honest- I've almost worn them almost every day the past week except when I've washed them ha.

F I V E
New Mat
I also scored this new mat from Lululemon last Saturday. Note for locals to Huntersville and Lake Norman Area- Lululemon at Birkdale Village is starting back up their free Saturday Morning classes. They are having another class tomorrow at 8:30 AM. Anyways, I went last Saturday and they gifted those that attended a new mat. Who doesn't love a new mat?! I love it! It is the perfect amount of cushion, so I can use it for both Yoga and Pilates.
I'm using my new mat in this picture (and wearing the Align Crop leggings- see I said I LOVE them.) Pilates teacher tip- When purchasing a mat for Pilates, get a mat with extra cushion. In Pilates, you need extra cushion for your Spine for The Rolling Exercises. A more cushioned mat also feels better on your spine for exercises such as The Abdominal Series and The Hundred. In this picture, I'm doing The  Hundred. Read how to do this exercise here.

Have a great weekend!
For this post, I'm linking up for Five on Friday and Friday Favorites.


Thursday, February 2, 2017

2:20 PM 0

Why I Started Going to the Chiropractor

Earlier this week, I went to the chiropractor. I was long overdue for an adjustment.  So I thought I'd share a little bit about why I initially starting going to the chiropractor.

During my first pregnancy, I had absolutely terrible headaches. Absolutely nothing would help. I'd try taking Tylenol coupled with a small glass of Coke as recommended by my midwife, but it DID NOT help. I was completely miserable and honestly was tired of taking Tylenol. I was looking for more natural options to help me get through my pregnancy and feeling better. I also had headaches during my second pregnancy; however, they were not near as bad, but I give that credit to seeing a chiropractor regularly from the very beginning of my pregnancy and staying proactive about keeping my spine in alignment.

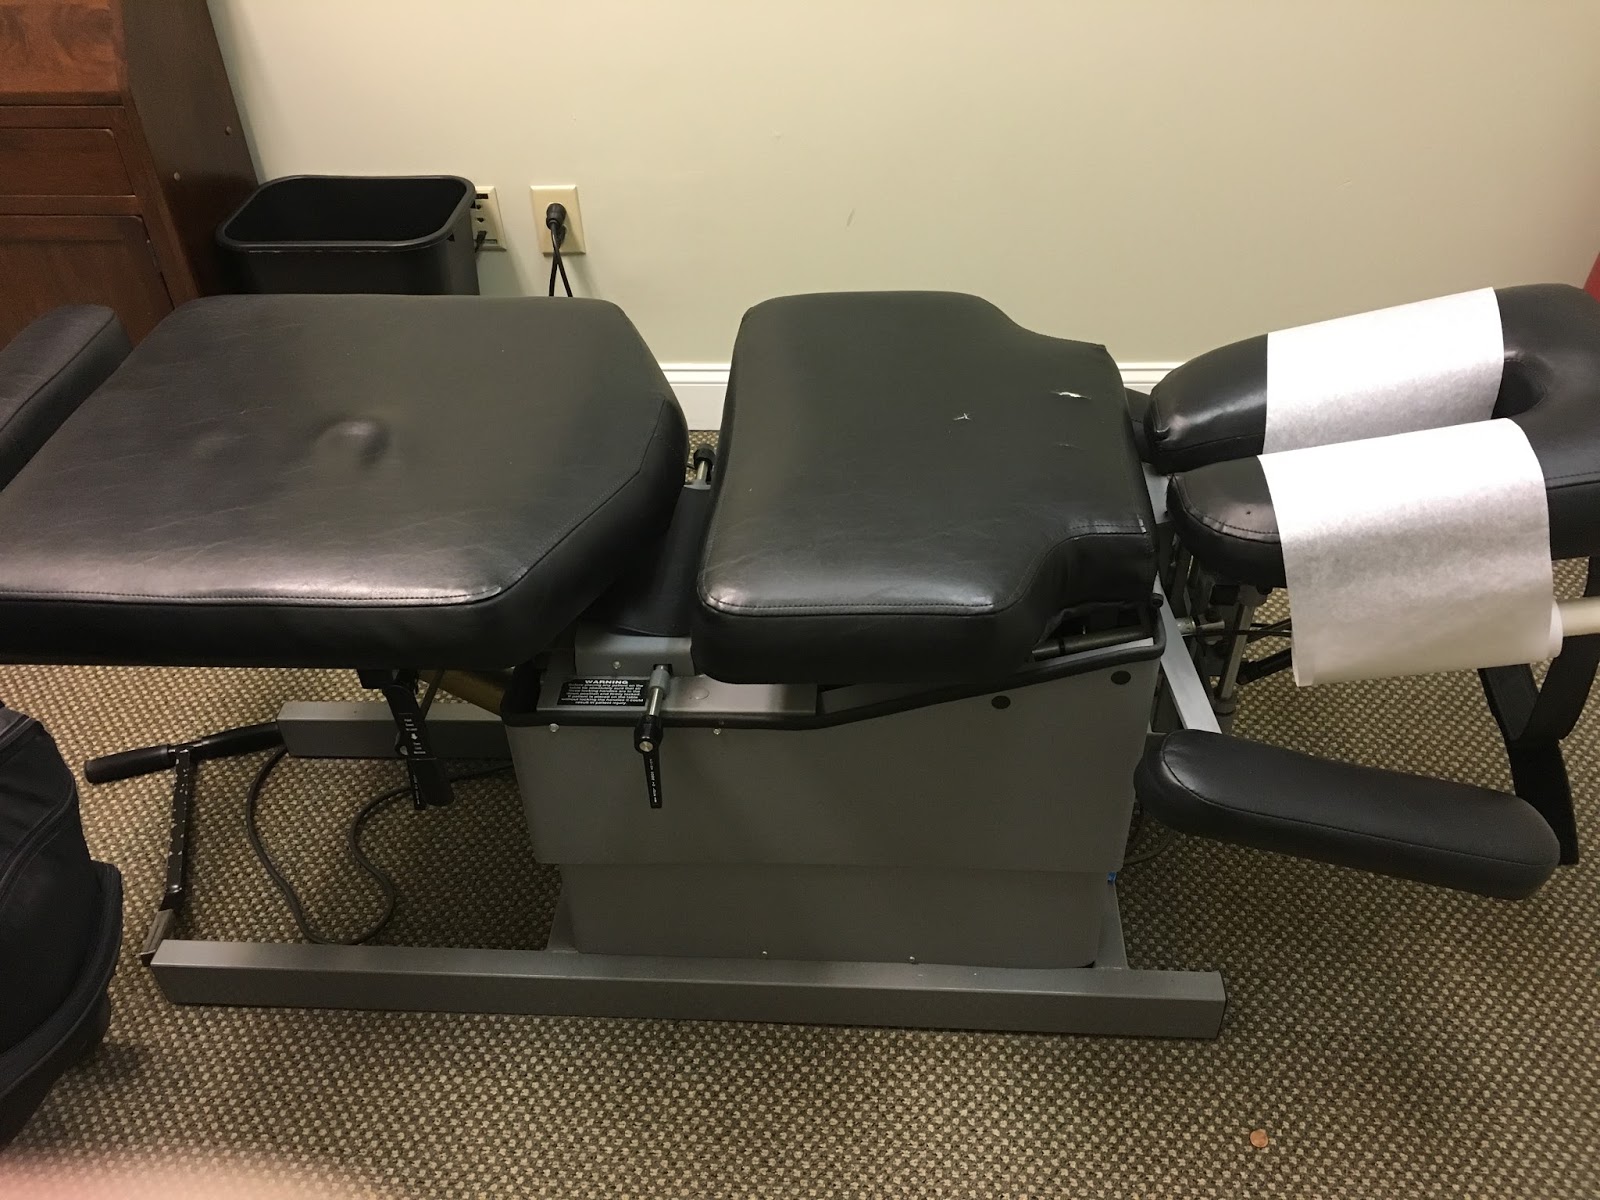
If you've never been to the chiropractor, this is what a chiropractic table looks like. The amazing thing about going to the chiropractor when you are pregnant is you get to lay on your belly! The middle piece of the table moves down.

My midwife had been telling me visit after visit to go see the chiropractor. And I continued to complain of my headaches. But I wrote it off because I initially thought going to the chiropractor was silly and was not going to solve my problem. Back when I was getting certified to teach Pilates, I was having rib pain. It felt like the upper left side of my rib cage was grinding together and was just really uncomfortable. My Pilates teacher trainer recommended that I go to the chiropractor, but I did not make the time to do it. So this wasn't the first time I was told to go see a chiropractor.

Cue my 3398509485408th visit to the midwife for a prenatal checkup and I'm still complaining of my headache and now of course coupled with low back pain (sciatic nerve pain, which is very common in pregnancy). I'm pretty sure the midwife was probably over me talking about my headache (as I'm sure my husband was) because she glared at me and said "Have you still not gone to the chiropractor?"

I should also add that headaches during pregnancy as well as high blood pressure can be a sign of preeclampsia (read about that here.) So it is important to communicate with your doctor or midwife about this; however, in my case my blood pressure was great and there were no other signs of concern.


So needless to say the next day, I picked up the phone and scheduled an appointment with a chiropractor. The chiropractor adjusted my neck and I instantly felt some relief from my headache. However (I'll skip the why for now so I don't bore you to death), I just felt like this chiropractor was not a good fit for me. While I didn't necessarily love this chiropractor, I did learn something cool about alignment. Did you know that if you put your feet together and one leg is longer than the other, then your spine and pelvis are out of alignment?

Lesson learned. I had just looked online and scheduled an appointment with a chiropractor without learning about the provider's background, training, and approaches to chiropractor care. So if you decide to go see a chiropractor, which I would definitely recommend, do yourself a favor and go by word of mouth. Ask around. I'm sure someone you know has seen a chiropractor before. Your massage therapist, dentist, Yoga teacher or in my case my former hair stylist.

My new chiropractor was a perfect fit. She really took her time to understand my concerns and helped me understand how chiropractic care would not only help alleviate my pain, but would make my pregnancy and labor/delivery easier. Basically my spine was out of alignment especially my cervical spine (neck). This was all related to the baby changing how weight was distributed in my body- yes, a big protruding belly is going to affect your neck and back. So without getting too detailed this was the root of my headaches.


I saw my chiropractor at least 2 times a week from week 26 of my pregnancy to the very end. I went this frequently because if I waited too long to get adjusted again, my headache would come back in full force. It also made it manageable for me to get around without shooting pain down my right leg.

Side note- I mean who doesn't want to do anything possible to make labor easier? Did you know that if your pelvis is in correct alignment, it helps baby get into the best position for delivery? I'm by no means a medical expert, but from my understanding, this helps you have natural birth without medical interventions and a decreased need for a C-Section. AND my favorite- decrease the amount of time you are in labor.

I'll be sharing some more later about why I love going to the chiropractor including how chiropractic care helped me during my pregnancy and even now.


Wednesday, February 1, 2017

7:19 AM 0

Workout Wednesday: Modifying Workouts and The Hundred

Happy Wednesday! Thanks for stopping by for the start of my new blog series- Workout Wednesday. Every Wednesday I'll be breaking down a Pilates Exercise for you with modifications- up this week is The Hundred. Before we get to the exercise, let's talk about why modifications are important.

One of the reasons I love the Pilates method is it is perfect for everyBODY. Regardless of age, fitness level, body shape, injuries, and wellness goals- Pilates is for you.

"But I have a knee injury or back pain or scoliosis or you fill in the blank, I can't do Pilates..."
Let's time out just for a minute for a little Pilates history lesson. Because I believe it's important to give credit to good ole' Joe. Joseph Pilates created his method because he was trying to improve his OWN health. As a child, Joe was very sickly and suffered both from asthma and rickets. Fun Fact- Joseph Pilates also developed much of the method during the First World War. To rehabilitate patients in the hospital on the Isle of the Man, he attached springs to a hospital bed to help strengthen patients who were unable to walk due to their injuries.


Above is one of the original designs for the Pilates Reformer. 

So there is no real reason why you can't do Pilates. You can modify the Pilates exercises to meet your current fitness level and needs. So whether you are a trying to to get back into shape after having a baby, rehabilitating a knee injury, or feeling like you're in the best shape you've ever been- Pilates is for you.

Why Modify Pilates Exercises? 
As a Pilates teacher, I strongly believe in modifying exercises as needed to help you build strength, utilizing proper alignment and technique without creating or worsening any current injuries or aliments. Pilates is all about engaging and activating muscles correctly and working out efficiently over doing so many repetitions incorrectly with poor body alignment. Your body gets absolutely nothing from working out this way except for injuries. So one last thing before we get to The Hundred- for each exercise I show you for Workout Wednesday, use the modifications I give you as needed.

The Hundred:
The Hundred is the first exercise in the Pilates Mat Series. This exercise focuses on breathing, getting the blood flowing, and warming you up for the matwork.


Steps:
1. Lie flat on your back on the mat and fold your knees into your chest. Arms are long by your sides. Drop your tail bone and feel each part of your spine connected to the mat.
2. Inhale, then on your exhale curl your chin into chest (lifting your head, coming up to around the tips of the shoulder blades) and extend your legs either into a table top, to ninety degrees, or forty five degrees (or lower.) It takes practice, but your goal should be to find this position in one motion with one breath.
3. Pump the arms straight up and down as if you were giving the floor an imaginary High Five. (Hands don't actually hit the floor. Arms stay lifted off of the mat.)
4. Inhale for five counts and exhale for 5 counts- This makes one repetition.
5. Continue pumping the arms with the same breathing pattern while keeping the abdominals working for 10 repetitions.
6. After your last repetition, fold your knees into your chest and give them a hug.


Modifications:
1. If you have a neck injury or neck pain, keep your head down on the mat for the entire exercise.
2. Place your legs in a tabletop position, if:
        a.) this is a new exercise for you- learn the proper form then advance the exercise by lowering the  
             legs to ninety degrees and then lowered towards the floor.
        b.) you are working on regaining strength in your abdominals for various reasons such as surgery  
             or postpartum mommas beginning to exercise again after baby.
        c.) you feel tension in your back when the legs are extended out long or there is a gap or
             "daylight" between your back and the mat.
3. Once you've become comfortable with The Hundred, try first extending the legs to ninety degrees (up to the ceiling.)
4. Then as you gain abdominal strength, try lowering the legs to forty five degrees.


Teacher Tips:
1. If at any point during the exercise you feel tension in your neck, put your head down on the mat. A small pillow or rolled up towel can be used here to rest the head and neck.
2. Keep your belly "scooped" by pressing your belly button into your spine, pushing the back of the rib cage into the floor, and thinking of sinking the belly to the floor. Each time you exhale, imagine you are trying to hollow out your abdominals.
3. Work up to full repetitions. If this a new exercise for you, you may want to begin with 2 to 5 repetitions.
4. Reminder: one repetition= 5 counts of breathing in through your nose and 5 counts of breathing out through your mouth.
5. Keep yourself honest and use the modifications to help yourself get stronger!

The Hundred is a great exercise for you to add into your current fitness regime- not just when you are doing a Pilates mat workout. Maybe give it a try before/after your run or before Yoga class or even first thing when you get up in the morning. Join me back next Wednesday for another Pilates Mat exercise.

Thanks again for joining me for Workout Wednesday!


P.S. for a sneak peek video of The Hundred with all modifications follow me on Facebook here.